Making the Handles and Button Loop
Click on each image to see a larger version. All seams are 1/4 inch unless otherwise stated.
Cut a piece of fabric 3 1/2 inches wide by 44 inches long then cut it in half lengthwise. This will give you two pieces 22 inches long by 3 1/2 inches wide.
Cut a piece of batting to exactly fit each handle piece.
Fold the fabric with the fabric right sides together and the batting on the outside. Pin to hold everything in place then stitch a 1/4 inch seam.
Turn the handles inside out and press with the seam along the centre.
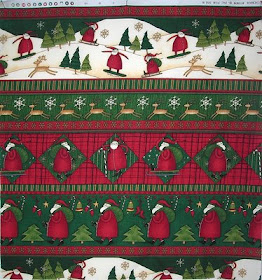
Quilt the handles - this helps to make them stronger and stops the batting from breaking up - 1/4 inch apart. I followed the pattern of my fabric. You could also stitch 1/4 inch in from each edge and then down the centre.
To make the button loop, cut a piece of fabric 1 1/2inches wide and 6 inches long. Fold in half lengthwise with right sides together. Stitch a 1/4 inch seam and turn right side out. Press.
To attach the handles to the bag, measure in 4 inches from the each side of the bag and pin the handle in place matching raw edges and making sure the seam is facing towards you. Click on the [icture below to see a close up.
Mark the centre point of the bag and pin the button loop on either side of this mark. Baste in place using a slighter larger stitch about 1/4 inch away from the seam line.
Be careful to keep the other side of the bag clear of the needle.
You are now ready to make and attach the lining!
Happy Stitching
Ann.
Sunday, November 30, 2008
Christmas Bag Tutorial - Part 1
There must be a thousand tutorials for making bags on the internet. Here's one more...
I'd rate this project as easy/beginner and some basic sewing and quilting skills are recommended. Click on each image to see a larger version. All seams are 1/4 inch unless otherwise stated.
I'm making this bag from two pieces of fabric 20 inches wide by 22 inches long. I kept the walking foot on to do all the sewing as it helps when making the handles and to stop the bag panels from slipping out of alignment.
This is a Debbie Mumm print that I bought at the post-Christmas sales years ago. It saves piecing but you could make up each side from strips of different width fabric.
Pin each panel to a piece of batting (I used a wool/polyester) about two inches wider all round.
Quilt your panel as desired. I used clear monofilament thread and stitched along a selection of the printed lines on the fabric. If you were using a pieced panel you could stitch in the ditch.
Start each row of quilting with the smallest stitch on your machine. Make four or five stitches then increase the stitch length (I used 3.5 on a Janome QC6260). Just before you reach the end reduce the stitch length to the smallest stitch and finish stitching.
Remember to turn the work and stitch each row in alternating direction left to right; right to left to stop the panel bunching up.
When you have finished the quilting, remove all the pins and trim the batting back to the same size as the fabric.
Place the bag panels right sides together matching the pattern or seams. Pin to hold in place. Using a smaller stitch (I used 2.2 on the Janome QC6260) and a half inch seam allowance, stitch around the three sides of the bag leaving the top edges open.
Now for the tricky part...boxing the corners.
Finger press the seams open either side of the corners for about three inches. Fold the corner into a triangle aligning the side and bottom seams. This is easier to do if you place your hand inside the bag.
Measure in two inches from the corner and pin across the triangle. Mark a chalk line half an inch beyond the pins. This is the stitching line.
Repeat for the other corner.
At this point many patterns tell you cut off the corners. I don't like to do this because I think it weakens the seams. It's up to you but I leave them in place.
Turn the bag right side out.
Next time, making and attaching the handles and button loop.
Happy Stitching,
Ann.
Tuesday, November 25, 2008
A Wonderful Gift
I received a parcel today from the lovely Christine (StitchNiche from APQ).
I felt so special as Christine had obvioulsy gone to a lot of trouble to chose lovely things as well as sharing some of her favourite recipes for yummy treats. Here's what was in the parcel.
Isn't the Snowman just adorable! I wish you could smell the Pumpkin Pie candle - it's delicious and so was the chocolate turkey.
Now I have to find just the right project for that delightful bundle of fabric. I think this will require tea and cake and a pile of magazines...
Thank you very much Christine.
Ann :)
Thursday, November 20, 2008
Symphony in Blue
All around my neighbourhood the jacarandas are in bloom. Everywhere a carpet of purple petals. My tree is dressed in its finery too.
I visited Craft Depot on the weekend as they are having a sale for the month of November. There were some terrific reductions. I was specifically looking for fabrics to make this quilt...
The pattern is called Paisley Parade and featured in American Patchwork & Quilting's Quilt Sampler Spring/Summer 2008.
This is what I have purchased so far...
I have ordered some more fabric from Country Pickin's at the Corner and will pop into Patchwork Products as they are also having a sale.
As the quilt is for my brother I am looking to substitute the florals.
Happy Stitching...Ann :)
Friday, November 14, 2008
A Surprise Package
Well, for a few weeks there I was busy making gifts for some of my APQ blog friends in the US and Canada with whom I had participated in various swaps.
They were great fun indeed, so I decided to surprise them with a small gift of either a table mat or wallhanging.
Each was *wrapped* in a paper bag with a rustic bow and included a calendar, a Christmas card and some chocolates.
Here's what I made...
A wallhanging for Kelli...
A table mat for Merritt...
A wallhanging for BCQuilter...
and a table mat for StitchNiche...
The parcels have all arrived safely and I'm delighted to say were a surprise to all.
I love being *Santa's Helper*
Ann.
Sunday, November 2, 2008
Sewing Caddy for a Friend
I decided to make a sewing caddy for a friend's birthday. This lovely lady makes beautiful quilts and her fabric choices are impeccable. She is particularly fond of traditional American prints.
Christine Book's delightful design was just the ticket. Here's Christine's version...
I chose a red, white and blue theme to acknowledge her American heritage and dyed the osnaburg with Parisienne essence to *age* the fabric. Unfortunately, I lost the pattern sheet for this project and had to draft it myself (after the intial panic subsided).
Sadly, I wont be able to include all the sewing accesories when I post it as it may trouble the post office. I'm sure my friend will delight in adding her own personal touches. I would love to see her face when she opens the parcel. I do hope she likes it.
Happy Stitching...Ann :)