Sunday, August 2, 2020

clarification

It's time to add binding!

Just to be clear - I am not hand quilting this quilt.

It's 100% machine quilted but for this no-sashing version of Quilt-As-You-Go, I chose to hand stitch the backing seams, kind of following the method Jera Brandvig from Quilting in the Rain uses.

You can machine stitch the backing joins with a stitch in the ditch foot (how is it I don't own one of these?)


In other news, I found a bottle of Marking Pencil Remover by Quilters Rule International in the back of a cupboard and by using a cotton bud (Q-tip?) was able to remove some of that wretched Hemline water-soluble (it's not) pencil.


Not perfect but much better. As always - test, test, test on your fabrics before using.

. . . ann . . .

Monday, July 27, 2020

therapeutic


I find hand sewing rather therapeutic - almost meditative. Now that all the blocks are quilted it's time to start stitching them together.

There are a couple of different methods for putting together the no-sashing method of Quilt-As-You-Go and I am using a combination.

Machine stitching the fronts and hand stitching the back. Good thing it's been a wet, wintry weekend to keep me indoors with needle and thread.

. . . ann . . .

Sunday, July 12, 2020

convinced


Based on Lori Kennedy's trials, I decided to give these markers a go. Here's my sample piece marked with the dark blue fine point marker.


I deliberately chose the dark colour and to really test it, left it to dry for four hours. Normally I would wash a marker out as soon as I had finished quilting.

I only rinsed out quickly under cold running water. This was the result.


I have circled a couple of  very small areas of residue which washed out after another run under the tap.

Feeling reasonably confident with the results, I decided to mark up one of the quilt blocks using the light blue marking pen. Here's the block marked and pinned ready to quilt.


You can clearly see the marks. Here's what the block looks like after quilting and a good rinse. The block was air dried.


I have to say that I'm impressed. The markers do what they say - wash out in cold water. The whole packet of markers cost just over $4 compared with the $12 paid for the Hemline water erasable pencil. Which didn't.

Here's a reminder . . . 


After rinsing and marked with Hemline's Water Erasable Pencil
 Lesson learned.

Disclaimer: Please check the markers on your fabrics before use. 


. . . ann . . .

Saturday, July 4, 2020

deception


I am loving my new machine and quilting on it is a dream.  I just threaded it, dialled in the recommended settings and started sewing. No tension issues, even stitches( mostly) and FMQ on the individual blocks has been a lot easier then wrangling a whole quilt.

Only one set back. . . 


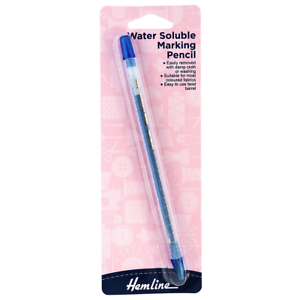
See those blue lines? They are supposed to be water soluble. As in water. And soluble. Yeah right. More like water resistant.

This is the culprit.


It says it right there. On the packaging. Water Soluble. Easily removable. To be fair it doesn't say what kind of water. Perhaps I should have used Evian. Or Mineral. Or Spring. Or Holy. 

Tap water? That's a Nope.

After saying a few choice words I checked the internet for a remedy and came across a suggestion to use baby wet wipes. I was sceptical but had a packet of ordinary wet wipes in the cupboard so tried those.

Surprisingly, they actually worked. Completely removed in some places, not all and not great where I've stitched over the markings but much better than the image above.

If only I'd checked out Lori Kennedy's blog post on markers, I would have learned that Crayola Ultra Clean Washable Markers are some of the best to use (not the red, yellow or orange ones).

So, I'm going to buy some and test them on a sample piece. I'll let you know the results or you can head over to Lori's blog and see how she fared.

Wishing those of you who do, a Happy Canada Day or Fourth of July.

...ann...

Sunday, June 21, 2020

twelve


Twelve is my new favourite number.

That's because I have twelve of these and I'm going to make them into a quilt. Usually I like a square quilt but this will be a rectangle.

The finished blocks are 16 inches square. Okay, so not twelve.

I was browsing the 'Net and found some videos on Quilt-As-You-Go with no sashing. It involves a lot more hand sewing but I don't mind that. It also means that I can comfortably quilt each block first.

To do that, I have another twelve. Inches that is. On my new sewing machine. Of throat space.


I'm really excited to have a machine (and on sale at 50% off retail mind you) that is a whole nine more inches of throat space than on my other machines.

Okay, so I'm more than a bit rusty when it comes to free motion but hey, it's a start. I used an 11 inch quilt stencil and manipulated the design to fill out to 15 inches. 

Look at those 12 inches of throat space! Did I say I was excited? You bet I am - jumpy claps!